Lemans #2 Episodes start here.
------------------
Episode one, introduction.
Episode two, trunk panel install part one.
Episode three, trunk panel install part two.
Episode four, door rust repair.
Episode five, tail light panel and rear crossmember.
Episode six, passenger quarter panel.
Episode seven, driver's quarter panel.
Episode eight, floor pan and rockers, part one.
Episode nine, floor pan and rockers, part two.
Episode ten, frame repair and prep, body drop.
Episode eleven, radiator core support and miscellaneous rust repair.
Episode twelve, trunk repair and more miscellaneous rust repair.
Episode thirteen, fender and inner fender repair.
Episode fourteen, panel prep and block and prime.

--------------------------
I have now reached the point where there is no more rust in the lower body shell, the frame has been repaired, straightened, and PO15'd, and the body is temporarily back down on the frame. Now it's time to move to more Stage Two repairs, like the core support and some of the small rust areas in the upper body.
Let's start with the core support. The area around the battery tray on these cars is typically rusted from battery acid, and my car was no exception. This is the driver's side where the rubber mount is located:


There is a factory bend in the vertical members of the the core support. But because the driver's side mount area had rusted to the point where there was no connecting metal, that vertical member had rolled out and was now in a straight line. You can sorta see that in the first photo above.
I had to restore the factory bend before I could fix the rust. But I couldn't just put a ratchet strap on it because the connecting metal had rusted away and ratcheting it would simply draw the horizontal members closer together. So I made up a rig:

This is a little hard to see, but the core support is laying on my bench, front facing up and top facing right. There is a bottle jack braced horizontally between the upper and lower crossmember. There's a stack of 2x6s between the jack and the upper member to take up space and to give the jack a stable base. I also put a ratchet strap from top to bottom.
I used the bottle jack both to open the space a little bit (it had collapsed about 1/8") and also to provide a pivot point. This allowed the ratchet strap to cause the driver's side vertical member to rotate as I cranked on it.
You also can see my angle gauge in the pic, which was set to the desired angle measured from the passenger side. I ratcheted until the angle of my gauge matched the angle of the vertical member. Once I had the correct angle I began welding.
In the above pic you can see that I already started making cuts. Here's a closer look:

This is a complicated little area where several intersecting structures and layers all come together. The angled area in the center is the back side of the interior brace where the rubber mount goes. I cut the external layer of sheet metal to uncover the rust on this brace, and then cut part of the back of the brace away.
It took me all day to get to this point:

You can also see the very thin and perforated metal to the right, which I also fixed, see below.
I took the core support back off and POR15d the inner structure:

While I was closing this in I also did the perforated area mentioned before. It was very thin from battery acid, so I cut that out and replaced it as well:


Here's the other side (faces the engine compartment):

I noticed as I was working on the driver's side that the passenger side vertical member also showed some signs of rust. Sure enough, more work. I cut out two squares of rust and POR15d everything I could reach:

Your looking at the inner surface of the passenger vertical member, with the core support upside down.
Here's a view of the finished repair of the top patch from the other side:

And here is the finished repair of the smaller patch:

No plastic filler on either repair!
Here's the completed work:

I really pleased with the way this turned out, especially considering the amount of rust damage.
Here's the test fit:

Here's the test fit with the fenders:

This is the pic I've used as the header pic in all my posts.
Now that the core support is fixed it's time to move on to some miscellaneous small rust sports.
The passenger upper cowl:

For some unknown reason the factory fastened the A pillar to the cowl with screws. Maybe not the best idea but definitely good for me, because this rust went all the way under it. I was able to remove the screws and gently pry it up to gain access underneath it. Not much access, but enough. Barely.
So I cut out the rust:

Welded in a patch:

The pic didn't come out that great, the actual repair looks a lot better. I was able to get all the way back to the inner structure of the windshield frame with new metal. The right side is butt welded. The left side is an overlaid seam with three plug welds, which was how it was originally. The point nearest the camera has yet to be welded.
Here's the repair, ground down, with a thin coat of glazing:
You can see the POR15 to the right, which I continued all the way to the left under the A pillar.
And, primer:

It isn't perfectly smooth, but it will be covered by the fender.
Now it's time to do the passenger outer cowl:

The inner flange was still generally solid which meant a relatively easy repair. I cut a piece of sheet metal and laid it on top of the existing metal. Since this will be a cut and butt, I cut a notch at the top to allow the top seam to lay down. I also cut the bottom notch because my angle grinder wheel would hit the protruding flange.
I did some plug welds:

After the cut and butt I put in some spot welds:

I finished up the welding:

And ground it smooth:

After a little bit of glazing putty I sprayed some primer:

This really came out nice, perhaps nicer than it needs to be since it's covered by the fender and no one will ever see it again.
I had previously repaired the roof:


Now for a repair I was sort of dreading, the rear window passenger sail panel area:


This is a complicated surface. The flange is bent at 90 degrees, and the vertical metal makes a slight bend outward as it transitions into the curve of the sail. That bend gets a bit sharper as it descends to the point where it forms the curve of the corner, and it also rotates into the surface that eventually becomes the top of the quarter.
I thought about it a little while then made my cut:

I thought about the best way to patch this, using the fewest number of pieces. One thing is, I didn't want a seam at the 90 because it's hard to grind. I also couldn't make the corner with one piece because of the way the curve is shaped.
I decided to first cover the most area possible with a single piece, and fill in the rest of the areas with two more small pieces.
Old rusty scrap and the first patch:

POR 15 on the inside, and the first patch:

That piece of sheet metal hanging over the package tray is just a heat shield. There's a plastic interior trim piece I didn't want to melt.
Tacked in:

Now for the next piece:

I let the first piece run wild since it will be hidden inside the panel.
And the third piece:

After grinding I put some putty on it and a coat of primer:


You can see that one of the welds needs to be ground down a bit more. Otherwise, I'm happy.
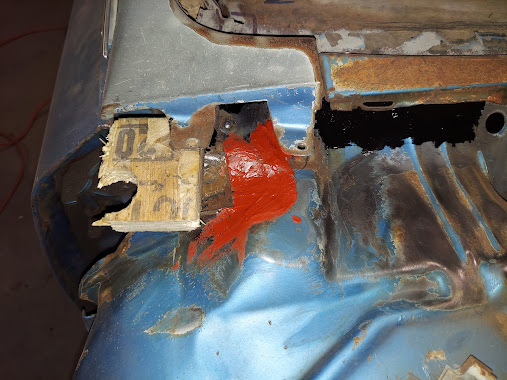
I started this episode with the repairs to the core support, and then I documented the passenger upper cowl. Right above that upper cowl repair was a rusted out hole in the passenger windshield gutter:

I once again propped up the outer A pillar cover with a piece of wood and made my cuts:


I let the first piece run wild since it will be hidden inside the pillar, put in the second piece, and welded up everything:

I ground everything smooth:


While working on this area I happened to look up and see another hole. Patched it and ground it out:


You can see that the flange lip is jagged from rust. Not sure if I'm going to fix that since it's covered by the butyl that holds the windshield. For now, it's done.
Now for the driver's side window gutter:

This was a quick and easy repair:

Primered:

Thankfully, the rest of the gutter is not too bad:

*****
Other rust spots will also require attention:
- the upper areas of the inside cowl, both sides
- Driver's side rear window lip
- Passenger door lower lip rust
From this point on in this post I will periodically update the progress with additional photos and commentary as needed.
No comments:
Post a Comment