Lemans #2 Episodes start here.
------------------
Episode one, introduction.
Episode two, trunk panel install part one.
Episode three, trunk panel install part two.
Episode four, door rust repair.
Episode five, tail light panel and rear crossmember.
Episode six, passenger quarter panel.
Episode seven, driver's quarter panel.
Episode eight, floor pan and rockers, part one.
Episode nine, floor pan and rockers, part two.
Episode ten, frame repair and prep, body drop.
Episode eleven, radiator core support and miscellaneous rust repair.
Episode twelve, trunk repair and more miscellaneous rust repair.
Episode thirteen, fender and inner fender repair.
Episode fourteen, panel prep and block and prime.

---------------------
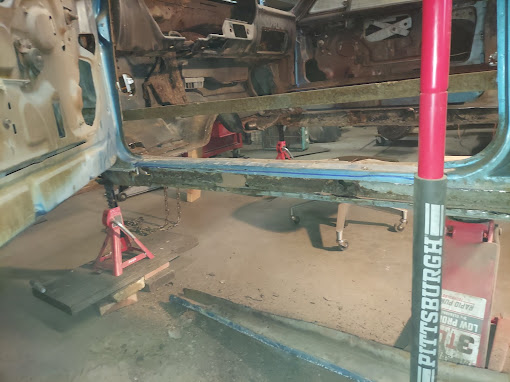
Now it's time to install the outer rockers. Here's the new pieces:
.

I purchased these from Amazon for $104.99 for the pair. They are made of a heavy enough gauge of metal. But they're are not complete stampings, they're more like skins. This AMD piece looks better, but because it's twice the price I bought the others.
I would not recommend these rockers unless your damage is confined to the outer part only, like mine is. If your rust continues into the door posts these panels will not address those areas.
My existing passenger side rocker:

(This door was replaced, and the new one was repaired in another episode.)
The bottom edge of the rocker connects to the inner rocker with the pinch weld flange, going all the way from the wheelhouse in the back to the door hinge pillar in front. The top surface of the rocker is essentially a flange that forms the threshold to the door opening and is spot welded on top the of floor panel edge.
The replacement rockers do have this part, it stops short at both ends and does not go under the door posts. I was happy the door post portions of the threshold were good. Plus the stamping of the threshold just looks different.
I started with the driver's side rocker and made my cut along the vertical plane that forms the weatherstrip contact point, and also along the lower pinch weld:

These were only the rough cuts. I left extra metal to be trimmed later. I re-verified the door gaps and door operation. It's important to continually check this as you go, because things can change quickly.
As mentioned, the original rocker is spot welded at the intersection points of the posts. I made my cuts so as to retain these spot weld points. I also made a zig zag to go around the door jamb metal, which created additional fitment problems. When I did the the passenger side rocker I made a straight cut in a different place to avoid this.
Time to weld:

You can see above that I overlaid the new panel on top of (well actually, next to) the old metal. This is the start of the cut and butt technique I've been mentioning.
But before I did the cut and butt over this long seam I carefully positioned and spot welded the front and back ends in their final locations. Here's the front:

In the above pic you can see that I have begun the cut and butt process, which was necessary in order to allow the rocker to move inward to bring it flush. When both ends of the new rocker are properly positioned this way the rest of the long horizontal seam will naturally move into alignment as I continue to cut and butt it.
You can also see that I retained the front cap of the original rocker, which was in decent condition. I kept it for a couple of reasons. First, since it is original it is already in the right spot; and second, the replacement rocker did not have the complete flanges needed to mate it to the body.
Even though I was careful my panel fitment did not quite line up. The new rocker ended up slightly too far inboard at the cap's weld point, so it doesn't quite come flush.
Why? The various bends that make the long vertical and horizontal planes (they form the place where the weatherstrip contacts) did not match the original. The angles were slightly off and the widths of the bends were not the same as the original panel. So if I'd brought the new rocker exactly flush with the front rocker cap these bends would not line up, and the cut and butt seam would not line up. And of course that would also move the location of the pinch weld flange farther outward.
So I compromised and got the most things to line up as I could. A little filler will eventually be needed on the rocker, so no big deal.
Finished and ground out:

So now that the front of the rocker is positioned in its final place let's go to the rear. There is a horizontal factory seam between the rocker and the quarter panel. On this side of the car this area was not rusty so I retained a part of the both the original quarter and the rocker area to use as flanges to weld to. So I cut and butted the new new rocker quarter panel to the lower flange and did the same with the on the quarter panel flange. You can see those connections in the second picture below.
Now that both the front and the back of the new rocker are in their final positions it's time to cut and butt the horizontal seam:

You can see my temporary door opening brace in the above pic. You can also see the ratchet strap I used to bring the lower lip of the new rocker inwards. I clamped a wide jaw vice grip on the flange to give the ratchet strap something to hook to, and I moved it along the flange as I butt welded. I needed to do this because the new rocker panel wanted to roll outwards and I wanted it to land close to where the inner rocker would be. I didn't want to make the weld then try to bend the whole thing inwards to spot weld the outer and inner rocker together.
I ground down the welds:

Another view, showing good gaps:

Here's a closer view of the quarter to rocker flange:

In this picture the rocker's butt weld hasn't been completed. Notice that not much of the original rocker remained, but there was enough to weld to.
And here's the ground down seams:

I left the rocker's lower pinch weld loose until I installed the floor panel with the attached inner rockers.
Here's the finished rocker:

I got to thinking that if I installed both rockers I might not be able to get the floor panel slipped in. So I decided to delay installing the passenger side rocker until after I installed the floor pan. That's what I did next, but we'll go ahead and document the passenger side install and the floor pan after.
As mentioned above, I thought I would try a different approach to the passenger side. One thing I didn't like about the driver's side install was that the cut I made was on the vertical plane, the place where the weatherstrip contacts when the door is closed. That's harder to grind. The other thing I didn't like was that my cut wasn't a straight line, it zig zagged outwards at both ends to go around the door posts.
So I decided to make my cut on the horizontal plane below the weatherstrip contact surface, and make a single straight cut from back to front:

I did not cut and butt this seam, which I meant trimmed and fitted, trimmed and fitted, trimmed and fitted. It was much more time consuming but I think I got better results for this difficult repair.
After all the trimming was done I tack welded the front edge to the rocker's front cap. I retained this part of the old rocker like I did the driver's side. Again I found that the new rocker's stamping was not terribly good. The rocker's curved main surface is too tall. But rather than fudging the error both top and bottom, this time I decided to commit to it being even to the bottom of the front cap, allowing it to protrude above the top.
This meant the top edge of the new rocker was proud of the old metal. I needed to roll this over all along the door opening so the new rocker would meet up with the weld point. This was also time consuming, but it actually worked pretty well. I started at the back and dollied it to meet the cut on the original sheet metal, going about 6-8 inches at a time. As I rolled it over I found that I sometimes needed to trim back the old metal a bit. When it was aligned I put in a couple of spot welds and moved forward to the next section, continually checking the new rocker's alignment and straightness with a straightedge.
Keeping it straight was important, and so was making sure the rocker aligned with the bottom of the door. I continually opened and closed the door to check the gap and also to see if the rocker was in or out too far. I adjusted the rocker as I went, finding that I sometimes needed to cut spot welds to reposition the rocker.
I worked my way to the front:

This actually turned out excellently.
Next I filled in the welds and ground them flat:

This grinding was so much easier, not only because it was one long cut, but also because the guard on my angle grinder would ride against the rocker below the weld, which kept me from accidently gouging out other surfaces.
Now for some glazing putty:

Primer:

And the gap is perfect:

And the seam below the quarter:

This side is where I used a part of the new rocker the flange before the whole rocker was done.
All finished:

Now, on to the big deal, the floor panel.
I started out by removing the perimeter waste metal left over from cutting out the old floor panel. At first I just drilled the spot welds, but these spot welds are quite large - like 3/8". I really didn't want to leave such big holes so I decided to use a smaller bit than that. I thought I could chisel the rest of the spot welds loose as did before, but drilling and chiseling dozens of spot welds is a lot of work. Then I got the bright idea that I could put the cut off wheel in the slot between the layers of sheet metal. The lowest layer was the old floor pan waste, so it wouldn't matter if I ground down into it.
Even better, I then figured out that I didn't even need to drill at all, I just worked the chisel in to spread the layers and carefully cut in between while holding my angle grinder at a slightly downward angle.
This worked great. It's much cleaner than a bunch of gnarly holes, which is what you see in the below pic of the driver's side:


Passenger side flange, and the remaining rusty rocker and the flange:


In the above pic you can see on the left center there are no holes at the point where the inner quarter joins the floor pan. By taking the grinder between the layers of sheetmetal I saved a boatload of time and left the flange much cleaner. Then I went ahead and bored several plug weld holes in the flange with a 1/4 inch bit, which for me is exactly the right size for plug welding.
You can also see that I left the extra floor sheetmetal at the rear. I decided I didn't want to remove these spot welds which also attach the trunk panel and a cross brace. I also left the metal around the package tray bracing. I decided to cut and butt it.
And last, here's the front lip:

This picture was taken before the repairs to the lower cowl area, which was covered in a previous episode.
Having cleaned up the flanges and prepped the surfaces, now it's time for the big deal, the floor panel. It ought to slip right in easy-peasy, right?
Surprisingly, the answer turned out to be yes. The panel fit with no issues.
It turned out that the sawhorse holding up the back of the body was positioned too close to the passenger compartment, which got in the way of test fitting the floor pan (see the picture above, two back). I jacked up the rear of the car and moved the sawhorse back.
Now it's time to test fit the floor:

It goes in from the underside, front-first on top of the toe panel flange, under the thresholds, under the inner quarter panel flanges, and eventually, even with the metal I left along the back. The panel seems to fit pretty nicely:

Now it's time to prep for the final install. I removed the floor panel and sanded the EDP from all the weld points and covered them with weld-through primer. I dollied all the car's flanges flat. I did not make them horizontal, however, because the new floor panel's long edges have a slight slope which seemed to match a slope in the original flanges.
Because of the limited reach of my new spot welder I plug welded. I drilled a bunch of holes then slid the front on top of the toe panel flange. Moving to the back, I jacked up the back of the panel into position.
Everything seemed to line up nicely. Here's the unwelded passenger flange at the door opening:

It lays nicely against the floor panel, which is necessary to get a proper plug weld.
Once I got the panel positioned correctly I put a few plug welds along the inner quarters only:


The temporary tack was because I decided to do a cut and butt to the existing floor panel remnant. It dawned on me that in order to do the cut and butt I would need to be standing on the new panel, and I can't have it sag beneath my weight.
This is all the welding I wanted to do until the body was back on the frame. I wanted to leave the floor as loose as possible because over the years the body settled into a different position. Because I relieved it of its frame, straightened the frame, replaced a bunch of structural metal, and installed new, unsquished rubber body mounts, things are going to need to move. I wanted to persuade the body back into alignment by putting it on the frame with the floor panel left loose.
The body drop will be covered in the next episode, but I will go ahead and document the finishing of the floor pan, which means the body has already been dropped in these pics.
Here's the completed spot welds:

The front spotwelds:

This took a bit of extra work to make it fit. The gap between the new panel and the toe boards was good at the transmission hump but the gaps spread apart going outwards towards the door openings. But since I had not welded the outer patches of the toe panels to the inner cowls I was able to raise up the toe panel to close the gap.
Now for the rear cut and butt:

This was much easier than I thought it would be. It lined up nice and I didn't have any problems with burn-through.
Here's the grind-out and glazing putty:

Here's the finished install:

Seam sealed:

I mentioned above that I had not yet completed the outer pieces of the toe panels, so I was now ready to do those repairs. The driver's side:

It's a little hard to see. The black area above the floor panel is the repaired lower part of the cowl, with a yet-to-be-repaired rusty area above that. Forward of the floor panel is the flange that attaches the toe panel to the inner cowl. That's the repair, connecting the toe panel to the lower cowl.
The passenger side:

Just need some grinding and then the repairs to the upper areas of the inner cowls.
I re-hung the driver door and did a little body work:

The gaps are pretty good, but not as good as the passenger side. The door is right were it's supposed to be but the lower gap is slightly narrower at the front. That's interesting because all the original metal is still in the same place, and the rocker had to be installed flush with the existing metal. And the door is the factory door, so was it an uneven gap from the factory?
So, I think I will want to do some work on the lower gap. If I decide to fix it I will touch spot welds all along the lower lip, which adds metal to the door. I'll grind it smooth and add a bit of filler if needed.
You can see the extent of the work on the driver's side. The door's lower rear corner rust was repaired, the front edge door damage was straightened, the new rocker got some bodywork, and the the seam where the new quarter was welded has also got some work done to it. These are all covered with a very thin layer of filler, and then the red glazing putty where necessary.
On the underside there still remained the waste metal from the rear floor panel cut and butt, plus I needed to finish the welds on the flange that meets the wheel house. Which means the body had to come off again. But that's ok, because I also need to undercoat it.
That happens in the next episode.
No comments:
Post a Comment