Lemans #2 Episodes start here.
------------------
Episode one, introduction.
Episode two, trunk panel install part one.
Episode three, trunk panel install part two.
Episode four, door rust repair.
Episode five, tail light panel and rear crossmember.
Episode six, passenger quarter panel.
Episode seven, driver's quarter panel.
Episode
eight, floor pan and rockers, part one.
Episode
nine, floor pan and rockers, part two.
Episode
ten, frame repair and prep, body drop.
Episode eleven, radiator core support and miscellaneous rust repair.
Episode twelve, trunk repair and more miscellaneous rust repair.
Episode thirteen, fender and inner fender repair.
Episode fourteen, panel prep and block and prime.
I am getting really close to my goal of making this derelict disaster of a body into a rust free, solid car that is ready to build. It was my 6 month goal to weld in all the replacement panels and drop the body back on the frame, but that actually took seven months. That was Stage One.
I have completed the repairs to the small rust areas, grinding welds, and the preliminary body work over the welded seams. These have added an additional 3 months.
My next goal was to have a completed, primed, and undercoated body at 12 months. This would be Stage Three, if you remember our build plan described in episode one.
Imagine if I'd bought a solid, no rust car (not exactly easy to find, I admit). A no-rust car would mean skipping that year of rust repair. By comparison, a year of work put into a no-rust car might have made it into an actual driver.
However, the purchase price of a no-rust car might be in the neighborhood of $8,000 to $10,000, while my car was a fraction of that. Essentially, I have spent a year and several thousand dollars to get to the same point. I'm ahead in the money but behind by a year (although my time is free to me).
As mentioned in other episodes, the work I've done has been very difficult. So, has it been worth it? Well, regarding the time spent, I'm really in no hurry to get the car finished. The challenge of making these difficult repairs has been rather satisfying. And the transformation is substantial. So the answer is, in the end it has definitely been worth it, but I will never, ever, do this again.
---------------
Today I'm going to continue the Stage Two repairs, starting with the trunk lid. As mentioned in episodes two and three, the rear of the car took a hit, which damaged the tail light panel, the frame, and the trunk lid. In addition, the rear lip required some rust repair.
It really didn't look all that bad:
The combination of a double layer of metal, the curve of the panel, and the tight area on the inside surface, made this a difficult repair. Worse, th damage was carried into the main part of the panel, pushing it up. I didn't notice that until later, unfortunately.
I started by removing the trim strip and then took the lid off the car. At first I thought I might try to cut the skin, but instead I decided to just work it into position. I leaned the panel against my work bench with the dent positioned against the floor. Since there's a peak in the rear lip I blocked up one end so that the dented part was flush with the floor. I took a big cold chisel and a large mallet and hammered the inside area against the concrete floor until the lip moved back into position. This took a lot of hammering.
Here is the dent after about 20 minutes of work:
After a bit more work I checked the lip with a straight edge on several surfaces, sighted down the lip to see if it was straight, and spent another half hour tweaking the alignment.
After I was satisfied, I put on a thin layer of putty:
Despite what you see in the pic the lip is actually is dead on straight, even though it looks curved.
Here's the inside:
I caused that dent when I was hammering the lip into place.
After doing a little hammer work I put a thin layer of putty on the inside:
Again, the lip is dead on straight, even though it doesn't look like it in the pic.
A little primer:
Here's the lip:
It's not flat, but didn't know it at the time.
This repair turned out to be pretty time consuming, and I thought I was done. I don't have pictures, but I ended up cutting the skin anyway. This relieved the stress in the panel and allowed the raised area to relax. I welded it up, ground down the welds, and put on some plastic filler. This is the one spot where I think the filler is too thick, probably 3/16". I'm going to be on the lookout for a replacement lid.
I also shaped the corner to improve the gap:
This is achieved by grinding the edge past the point of where you want the gap to be, and then touching welds along the edge. I then ground and shaped the welded edge, added a bit of glaze, and now the gap is excellent.
Ok, on to the two rusted areas on the lip. What happens is the panel gets moisture between the outer skin and the inner structure, which of course flows to the lowest point, the rear lip. Over time this area will also accumulate dirt, which holds moisture and leads to rust. In my case there was no rust through, but what was evident was the beginning of a problem. The fold over was bulging in two places, which meant rust was forming and pushing the layers apart.
I carefully ground along the edge of the lip until the fold of the sheetmetal divided between the outside skin and the inside flange. I then used my Dremel to cut vertical slits on each side of the bulge, and removed the piece of lip to reveal the inside flange. I pushed a putty knife between the layers to clear out the rust that had swelled the layers apart, then brushed some POR15 so that it would flow down into the slot:
You can also see the patch I cut. I used the old piece as a pattern, then welded the new piece in:
This is actually the second rusted lip area. But the idea is the same for both areas:
Grinding and a small amount of putty, and we're done:
These two repairs were actually pretty easy. Combined with the trunk dent, it took me a day to do the whole thing.
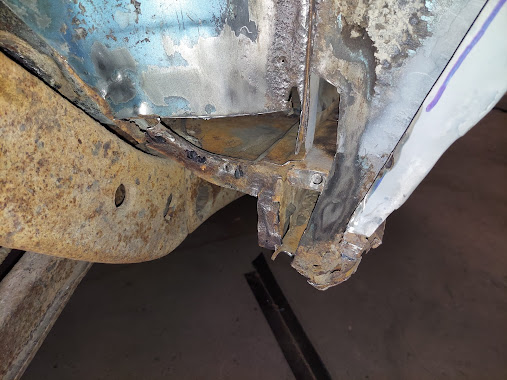
I used the same technique on the driver's door lower flange. This is a problematic area for rust on these cars. In my case there was light rust all along the flange, and two areas where the rust had pushed apart the fold-over.
I first gave the area a good wire brushing with the angle grinder. I then ground the lip until I could see the separation between the door skin and the flange:
I found that when welding in the patch this ground area provides just the right amount of room to add the welding bead and grind it flush.
I POR15'd the entire flange:
As I've mentioned elsewhere, POR15 really likes to flow into cracks. It should flow right in between the flange and the fold-over and protect those areas.
Next, because of the tight quarters I cut the fold-over on each end with my dremel. Even with the dremel I needed to cut the flange at an angle. I then cut the patches, welded them in, and ground them out:
Just a little putty to touch these up and we're good to go.
Another little issue was the trunk emblem. I pulled the trigger on the decision to delete many of the emblems and badges, and the first one was the trunk lid emblem. I welded and ground the holes and put some glazing putty on it:
Sanded out and primered:
The rear window gutter had a couple of rust perforations, which when wirebrushed widened into holes. I cut out the first one:
You can also see a second perforation, lower right, and a third just above the lower trim clip pin. The wetness is Evapo Rust.
I welded in a patch and started on the smaller hole:
The screw is my temporary handle. For the third perforation (above, just below the trim pin) I just welded it closed and ground it out. Also, the area is pock marked with rust craters, so I'll do some wire brushing and coat the gutter with POR15.
Here's the patches, ground out.
Just above that the window flange was rusty, so I cut it off and POR15'd everything I could reach:
I welded in a new piece and ground it out:
This was a little uglier than other things I have repaired on this car. The factory leaded the seam between the quarter and the roof, which they carried around the corner and into this area. That made for some difficult welding.
Here it is with a thin layer of glazing putty:
I thought this was the last of the rust.
But then I discovered this:
Arrrgh. This is the driver's side of the package tray, looking from the center. It's in a tight spot, and it was discouraging. I thought I was finally done with the rust. But at this writing I'm going to leave this for later and move on to other tasks.
Moving on, I noted in a previous episode that the body had been raised from the frame a second time. This was to finish up the welding and grinding underneath in preparation for undercoat. The repair of the passenger rear rocker cap was part of this.
Here's what I started with:
You might remember how it looked before:
The whole corner was pretty much gone.
I didn't take any pictures of the first part of the repair, which was to recreate the quarter panel portion of the wheel lip seam. So that's already done. Next I did the lower part, the rocker cap. It needed a curved bend, and metal doesn't like to do this unless persuaded.
I cut a piece of scrap sheet metal with the correct curve and clamped it and the cap piece in the vice:
You can sorta see that I already had made the horizontal bend that interfaces with the previously mentioned upper cap. You can also see the notch I cut. This is the fold point for the the bend I'm about to do and will form the corner of the cap.
I started hammering it over:
And here's a look at the two bends:
I touched a weld on the corner and ground it smooth. Another bend will be added at the bottom or the cap to tuck under and connect to the lower lip of the rocker. The cap also forms a rounded corner as it transitions into the bottom of the rocker.
Now that the cap is shaped I drilled a couple of holes for plug welds and test fitted it:
Looks good. Here you can see the upper part of the repair. You can also see that I welded and ground the notch that forms the corner of upper right of the cap, and I rounded under the lower part of the cap.
The cap needed a bit of touching up with the grinder to make it align at the seam and lie properly along the long curve.
Here's the completed repair:
You can see the rounded lower corner, and also the forming I did to make the cap conform to the bottom of the rocker. This was another one of those cases of not knowing what the original looked like. I just sort of made it up as I went.
You can't really see it, but I also put in the plug welds that connect the front of the wheelhouse to the floor panel, and also I did the rear wheelhouse which connects to the trunk braces.
There's a hundred little tasks like this that need to be done before I can undercoat, which was covered in e
pisode nine.
Time to move on to the nose piece. I had forgotten about this on a shelf out of sight. This is the part that goes on the front above the grill, forming the edge that interfaces with the front of the hood and the grill pods below.
It, like nearly every other surface of the car, had taken a hit. Actually, more than one hit:
What seems like a small amount of damage took me a couple of Saturdays. The main point of impact seemed to be the vertical center ridge. I worked from the back side with hammer and a blunt chisel to shape it. Sometimes I turned the chisel around and used this semi-rounded surface to ease out the dents.
The worst damage was to the lip on the passenger side. That dent pushed up the horizontal edge where the hood mates. This is supposed to be a straight line but mine was up and in about 1/4" over a six inch span.
This was hard. It's a tough spot being a corner. I found I needed to work two areas at once. The dent had basically flattened the curved surface below the horizontal edge which created a rigid resistance to moving the edge. It's similar to a rolled bead stiffening a panel. So I started by easing the flattened area into a rounded surface, which allowed me to move the horizontal edge a little. Going back and forth between the two took over an hour, but I got it straight and got the dent out.
Here's the first thin layer of glazing putty (it didn't need any plastic filler):
Although I kept the putty thin it took several coats to true up the multiple curves of the surface. Most of it got sanded off.
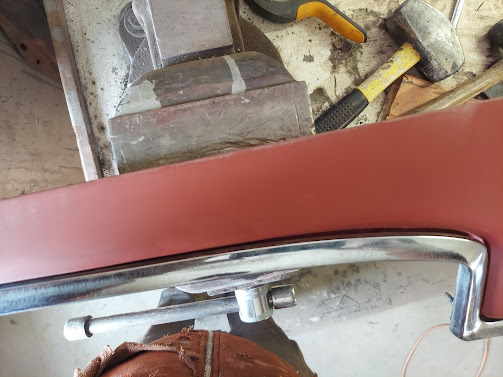
Primered and test fitting the trim:
Now, I was pretty pleased with myself. That is, until I started looking closer:
The shape of the curve did not match the trim, leaving a rather substantial gap. It looked even worse in person. I thought it was good, but apparently the damage it suffered changed the shape of the curve, which without the trim piece was not noticeable.
A friend of mine happened to stop by and we talked about how to fix this. After thinking about it for a while I took the nose off the car to look at it. I had laid it on my bench vise which spurred an idea. So I clamped it in the bench vise so that I could pry on the lip with a crow's foot:
Sorry about the messy bench.
Hard to believe, but this actually worked:
I didn't even need filler or glaze!
Now I turned to welding the holes for the Pontiac letters:
What was the designer thinking? Individual letters and 14 holes!
I dollied out the dent, welded up the holes, ground down the welds and put some glazing putty on them:
I sanded and primered:
I'm pleased with the way this turned out.
I'll be adding to this post additional repairs as I complete them.


No comments:
Post a Comment