Lemans #2 Episodes start here.
------------------
Episode one, introduction.
Episode two, trunk panel install part one.
Episode three, trunk panel install part two.
Episode four, door rust repair.
Episode five, tail light panel and rear crossmember.
Episode six, passenger quarter panel.
Episode seven, driver's quarter panel.
Episode
eight, floor pan and rockers, part one.
Episode
nine, floor pan and rockers, part two.
Episode
ten, frame repair and prep, body drop.
Episode eleven, radiator core support and miscellaneous rust repair.
Episode twelve, trunk repair and more miscellaneous rust repair.
Episode thirteen, fender and inner fender repair.
Episode fourteen, panel prep and block and prime.

This is our last official episode, having achieved our one year goal of fixing the rust, doing the bodywork, and priming the car. The car was listed on Faceborg marketplace on April 1st, and the new owner picked it up this morning, April 8th.
This last episode will cover the panel prep for block and prime. This is another big task, where all the gaps need to be checked and aligned, the door jambs, trunk jambs, the cowls and other untouched surfaces need to be sanded to accept primer, and the surface rust and degraded original paint must be sanded out.
But before I get to all this it's time for a pre-primer review of where we came from.
The passenger side, before:
Passenger side after:
That's the nose piece hanging in front.
Passenger door before:
Passenger door after:
Passenger lower quarter before:
And after:
Driver's side before:
Driver's side after:
Driver's door gap before:
Driver's door gap after:
Driver lower quarter before:
And after:
Ok, Enough reminiscing. Back to the subject at hand.
There's a lot of what I would call desert rust on the up-facing surfaces. The paint gets baked off by the sun leaving the bare metal, but it only rusts a little. At the recommendation from several sources I bought a gallon of this:
And it does work pretty well. It's a water-based product and reusable. However, since it's designed to immerse rusty parts I needed to come up with another application option.
The roof was first to receive my Evapo Rust treatment method. The paint had totally baked off of it years ago. I decided to try soaking some rags in the stuff and laying them out. I did the passenger side first, letting the wet rags lay there overnight. Then I sanded with 60 grit followed by 120 and got this result:
I'm pretty impressed. The stuff worked surprisingly good in a situation it was not designed for.
I fixed a little ding (above, lower right), soaked and sanded the driver side, then primered it:
Moving to the back, both the area between the sails and a large spot on the trunk were also rusty:

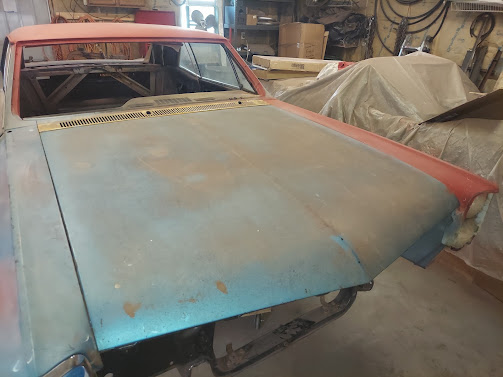
Now for the hood. The hood's been leaning against the wall for months, out of sight and out of mind. There was a dent in the lip corresponding to the damage to the nose (covered in another episode), a couple dings elsewhere, and there were also the emblem holes I needed to weld up:
And it needed a lot of sanding. The surface looked like a dried mud flat viewed from an airplane. I took some 60 grit to it with my palm sander and the flaked areas came off relatively easily. Next I tried my flap disk on the angle grinder and that just turned the paint into goo. So I put on a wire wheel and that really did the trick. 90% of the surface got bare. I brushed on some paint remover on the rest.
I went back to the palm sander and went over it several times. The surface was now good enough for doing my soaked rag technique. I laid them out on one half of the hood:
You can also see the results of hours of sanding, and the work I began on the emblem removal.
Here's the bare hood:
Next job was to remove the chrome trim in order to sand the surface underneath:

These were not easy to get out. Ideally, the door ought to be emptied of its glass, because the glass can't be lowered enough to get a good angle on the small screws that hold the window felt on. I thought I had stripped couple of them, but I gave the screw driver a couple of raps with a hammer to sort of break things loose and all the screws came out except one. That one was on the driver's side back seat trim, the very back screw next to the sail. I just ground the head off it with my Dremel.
And, the screws holding the door trim where the wing windows are means the wing windows need to come out. In my case, however, the passenger door is a replacement that came bare. I had swapped the guts from the existing door to this door and didn't put back that screw so the trim came out just fine.
The A pillar trim is held on by several large headed screws hidden under the door seal. These screws all came out pretty easily:
Now it's time to mask. Although there really isn't much to protect I still didn't want to get primer on the glass, my new undercoating, or the frame.
I got two wet coats on everything:

This took three pots of primer (about 1/3 of the gallon). I did get some tiger striping, but the car been multi-colored for so long that it was very gratifying just to see it all one color. The tiger striping will sand out.
The primer also revealed the quality of my body work. My oldest work (the quarters, rockers, etc,) fared the best. I spent the most time on the oldest work, so this makes sense. I was very pleased. The latest work, like the hood, was also the worst. It was no means bad, but it clearly didn't show the level of finish of the older work and will require additional work to be acceptable.
Also, the primer revealed a few dings and dents I had missed, plus surface flaws like some deep sanding marks.
As an example, the driver's tail light area came out very good:
But the passenger side needs more work:
You can see the vertical line is not quite right.
That's the reason for block and prime, to gradually sand out the surface flaws as subsequent coats of primer are applied:
All the dark spots are areas that are slightly proud of the surface. You can also see that I had to touch up the sail panel seam (on both sides, actually), and I fixed a missed dent on the hood.
After spraying a subsequent primer coat and sanding you can see the improvement:
I put about four coats on the bodyworked areas, and it will probably need maybe two more in order to block out perfectly flat. The un-bodyworked area only have about two coats.
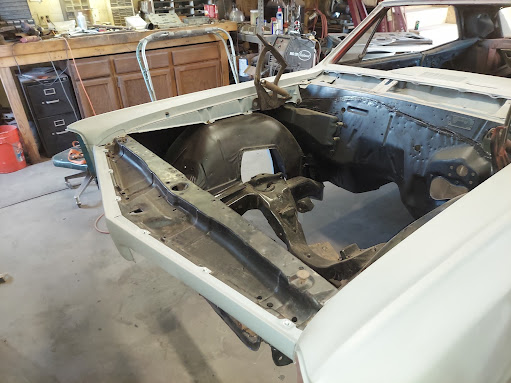
Now for the firewall:
I cleaned off the seam sealer to gain access to the area underneath, which is a potential rust point. There was some rust but the seam was still solid. I gave a good wire brushing to the area and it did clean up pretty well. I taped it off and put on a narrow strip of POR15 to prevent future rust, then covered it with seam sealer.
Next I sanded:
And painted on the POR15:
Though it's glossy it will turn to satin as it dries.
Now it's time to remove all the body panels (one at a time due to lack of space) in order to prep their back sides and the corresponding jambs. I started with the passenger side. First I needed to deal with the rear door gap, which was too wide for my taste. Turns out the door was as far back as the hinge mounting points would allow.
The hinges attach to the cowl by means of 2 pieces of steel, each with three threaded bolt holes, positioned on the inside surface of the cowl and captured loosely with sheetmetal cages. On the cowl there are 3 rectangular holes per hinge which allow the the bolts to pass through to thread into the plates.
Those holes pass through a double layer of sheetmetal, and in my case the inner and outer layer did not line up. I got out the Dremel and buzzed out the rear edge of the holes. This allowed the plates to move farther to the rear before the bolts touch the edge of the holes.
Now that I have enough hinge adjustment it's time to sand and prime the jamb and the cowl. This is slow and frustrating work. Sanding every nook and cranny involves a lot of detail, and it's got to be right because every car guy looks at the jambs when checking out a car:
I left a headless bolt in the bottom hinge because it's much easier to reinstall the door.
With the jamb done it's time to sand out and prime the inner door:
The repair to the inner corner of this door was covered
here.
After everything dried I rehung the door and adjusted for the rear and bottom gaps. My hinge modification worked perfectly and the gaps are exactly what I wanted:
The narrower gap makes me much happier.
Next I moved over to the driver's side. After wirebrushing everything some rust-out became apparent on the driver's A pillar. Arrrgh!
After I cut it open I found a blob of some sort of foam rubber just below the rust. Apparently the factory put this in for some reason I don't know about, and the water that had got in the A pillar was trapped by the foam rubber. Eventually it rusted.
I cut it out, brushed POR15 on everything I could reach, and put in a patch:
I can confidently state at this point that there is literally no place on the car I haven't touched. There cannot be any more rust, because every nook and cranny has now been examined, sanded, prepped, and primered.
The driver's side jambs:
And the driver's side door opening:
This all came out very nice.
I also sanded and primed the inside of the hood:
More time-consuming detail work here.
Primered the dash:
And the inside of the trunk:
And the trunk floor:
Bedliner sprayed:
I ran out of primer so I decided to assemble the front in order to test fit everything:
Getting the gaps right is a tedious job. It's one thing to hang the doors and get them lined up and operating correctly, but it's entirely something else to get the hood, fenders, and doors all to all line up simultaneously. I frankly don't know how the factory was able to churn out these cars and not spend hours fitting the panels.
It's the hood that dictates the placement of everything else, which creates a somewhat interesting puzzle. The doors cannot be adjusted unless the fenders are off. The fenders cannot be taken off unless the hood is off. So if the hood isn't right the fenders need to be moved which changes the front gap on the door.
When I put the hood on the gaps were way too tight, which meant the fenders had to move out. The hood gaps were also not the same front to back, and the fenders were at the edge of their full adjustment at the core support. Everything needed to shift towards the driver's side, so my first move was to loosen the core support and move it over a bit.
I really didn't want to take the hood off again. I'm working alone and the hood is just too big and heavy to manage by myself. Cherry picker to the rescue. I suspended the driver's side of the hood with a ratchet strap and removed the hinge bolts and that freed up the fender. Bingo.
This was the correction needed:
I wrote the distances and the direction on the tape because once the panels are off it's hard for me to remember all the various things that need to be moved.
I put it all back together and viola, it was spot on:
In addition, the hood and nose piece lined up well, which vindicates my repair of the edge of the nose and the front edge of the hood.
I belatedly remembered that the inner fenders have a splash shield in the front, so I wirebrushed and straightened them. One of them had a rust hole in the flange so I welded in a piece of sheet metal, then POR15'd everything:
After assembling the grill I found something else to fix:
The nose has too much curve and doesn't meet up with the bumper. That is sometimes what you get when you're trying to make an intricate repair and the panel is not on the car. I think, though, that I might be able to simply pull it out if I properly secure the nose piece in the vice.
There is still a little touching up to do in various places, but generally speaking, the body is done. It's time to reassemble the car, get everything aligned, and do the photo shoot for the sale:
****
In my very
first episode I outlined my build strategy. Stage One was the completion of the rust repair and panel replacement on the body shell. Stage Two was the repair of the bolt on panels, like doors and trunk lid. Stage Three was to get the body work done and the body in primer.
Saturday March 9th 2024, after approximately 700 hours of labor, marks the day I achieved my goal to get the car in primer. I wanted to be at this point after one year. I began the project on April 1st 2023, so I beat that goal by three weeks.
I wish the new owner, Andy, to have great enjoyment of the car.
It's left a big empty space:
About 6 months later this space got filled by, yes, another 1967 Lemans... That story is covered starting
here.
Thank you for reading.


No comments:
Post a Comment