October 5th, 2024:

October 6th, 2024:

Episode one, introduction,
here.
Episode two, disassembly and assessment,
here.
Episode three, rough body work,
here.
Episode four, quarters,
here.
Episode five, toe panel, rockers,
here.
Episode six, fenders, inner fenders,
here.
Episode seven, the doors, found
here.
Episode eight, tail light panel, hood, found
here.
Episode nine, Hood, trunk, windshield gutter, cowl and firewall, heater box, found
here.
Episode ten, Back glass gutter, grill, found
here.
Episode eleven, headlight extensions, core support, roof, found
here.
Episode twelve, final body prep and reassembly, found
here.
Episode thirteen, bonus episode, final photos, found
here.
-------------------------------
Had I known at the onset the degree of damage and rust in this area I might have not bought the car. At the very least, it likely would have changed my repair strategy. With this level of damage I might have chosen to replace the tail light panel, not to mention the quarter.
But as far as I know a Lemans tail light panel is not available as a reproduction. For Lemans #1 I bought the GTO panel, but for this car I really didn't want to spend the hundreds of dollars. It's a budget build, after all.
That means I must fix it.
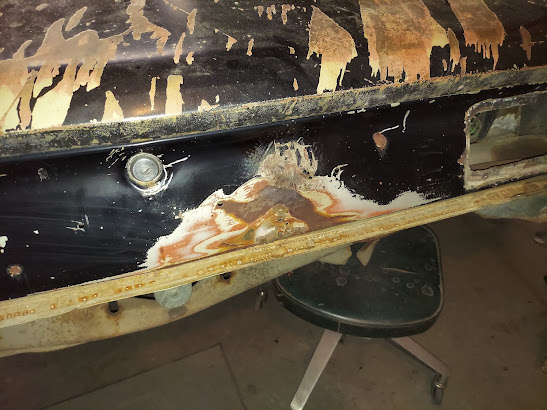
This is what I started with:
It's a little hard to see, but it took a hit to the horizontal lip, which pushed it forward a good half inch or so. You can see the arched wrinkle above the impact point where there is secondary damage, and there are three slide hammer holes as well.
Plus, there was what I thought was minor rust around both tail lights and the left eyebrow:
You can see the ill-fitting trim piece resulting from a hit to the corner.
The list of repairs is as follows:
- The center hit
- The tail light corners
- The lower pinch weld area
- The tail light flange
- The tail light eyebrow
- The trunk corner
That's quite a list.
Repairing the Center Hit
1/3/25 I started by stripping the paint, no easy task with this car. The paint just turns to goop and clogs up my flap disk. The wire wheel seems to do the best job, but I still have more work to do:
After welding up the slide hammer holes I moved inside the trunk and started hammering the pushed in area with a piece of heavy steel and a big mallet. This was a lot of work. Once the area was moved back into position a lot of the secondary damage went away, but I still did some hammer and dolly work.
Now that it's close I put on a thin layer of filler:
This is good enough for now.
Repairing The Inner Tail Light Corners
Both tail light openings had this rust on the lower inner corners:
You can also see where I already welded up some pin holes above it.
So I cut out the rust:
This patch must be constructed out of multiple pieces, in this case, three. I started by making a template of the curve of the corner, then cut out the first piece to that shape.
I added a thin strip to make the step:
I put extra weld in here because the original corner does not have a sharp turn. This allowed me to grind the weld into the more gradual curve. I also welded and ground the back.
Notice also that I left the piece attached. It's much easier to position and weld this way.
Here's the result:
I trimmed the patch to fit and welded it in:
I made the last piece, welded it in, and ground it all smooth:
This came out really nice. The same damage was on the passenger side as well, so the procedure was exactly the same.
Repairing The Lower Pinch Weld Area
There were two rusted areas below the driver's tail light, the pinch weld flange and an 1 1/2" rust hole in the corner below the quarter panel interface:
I wasn't certain I could pull off these repairs. The corner in particular is a complicated shape in a tight area. But doubt or inexperience has rarely dissuaded me from anything.
Sometimes it should have...
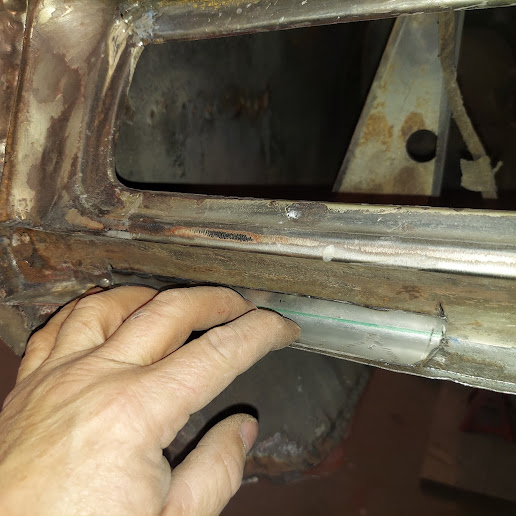
I first cut out the pinch weld rust:
I started bending a scrap of sheet metal on my bench vice into the general shape needed. Since the corner turn is somewhat gradual I made partial bends in three locations, one just above my horizontal line, one on my horizontal line, and one just below it. The effect of the combined bends makes for a more gradual corner.
After some fine tuning I made my first test fit:
I liked the shape of the corner, so I started to shape the patch so it would fit. Then I wire wheeled the trunk flange, hammered and dollied it, then painted on some POR15:
I drilled several holes for spot welds and clamped it into position:
The top right was overlapping so I ran the angle grinder along the top edge and spotted it in. I added spot welds around the perimeter until the weld was continuous, then ground everything smooth:
This came out really nice.
Now for the harder part, that rust hole in the corner. This area is where the tail light panel, trunk panel, and quarter panel all come together. What was missing here was basically the end of the tail light panel, which includes the tail light panel flange that spotwelds to the quarter (which I would call one of the "walls"). Then there's the other "wall" forming a corner with this spotweld flange. It connects to the rest of the tail light panel. The lower horizontal piece I'll call the "floor," and the upper horizontal piece where the tail light eyebrow trim is held with a sheet metal trim screw is the "roof."
After thinking about it, I decided to create the corner first where the two "walls" join. It's pretty close to a 90. I bent a piece and welded in wall #2 to the right side of the hole. This place is where there is an outside 45 corner where the metal turns forward (inward) to intersect with the bumper recess. I also filled the spot welds on the outside of the quarter to connect the wall #1.
Then I cut the "floor" and a "roof" pieces and welded them in:
This worked surprisingly well. I took the Dremel to the welds and cleaned it all up.
Repairing the Tail Light Flange
Not only was the driver's side tail light mounting flange rusted, there were some pinholes of rust, around the perimeter of the opening (mentioned above), and the lower inside corners of both tail light openings had rust (repaired above).
When I welded up the pinholes I backed them with a piece of copper to prevent blowthrough.
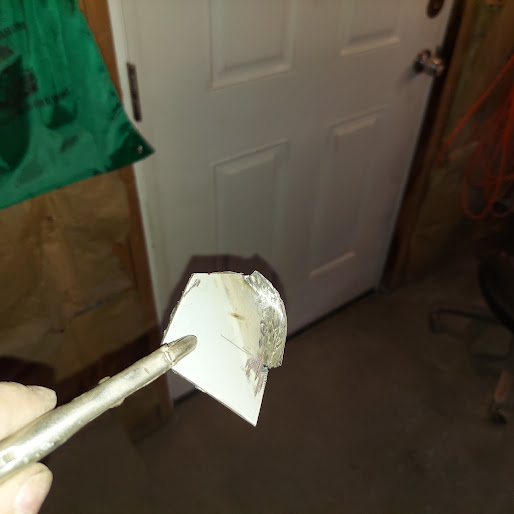
Then I bent up a patch:
Ignore the gaping rust hole above it for now.
This piece took some work to shape. I bent it on the vice into a long narrow "Z" shape, being careful to get the lines straight, then welded it in:
Looks good, especially compared to what was there:
Having completed all the welding on the tail light panel, I commenced with finishing out the repairs. A little bit of putty:
At the same time I finished up the center portion of the panel:
Sanded out and then some primer:
Repairing The Tail Light Eyebrow
Now comes the hard part.
Having completed the bodywork on the the tail light panel and driver's quarter (see Episode four), I finally decided to fix the eyebrow. Months ago I got a cold dose of reality when I started digging into this repair. I thought the rust was minor, but that's not what I found when I started stripping it.
A bit of archaeology tells all. Amidst the clouds of white Bondo dust my eyes beheld an emerging canyon of rust:
Oh, my. This area was both collision damaged and badly rusted. Not only was there extensive rust on the eyebrow, the upper and lower extensions of the tail light panel and the quarter panel were largely rusted away. The collision damage carried into the quarter panel and the taillight mounting area.
(This picture was taken before the tail light panel repairs described above.)
I was intimidated. Not only was I rebuilding a very complicated shape, the eyebrow trim piece needed to look and fit right. But before I could start cutting and welding the metal needed to be returned to its proper rearward location. It needed to move rearward about a half inch at the upper left corner.
I put the narrow end of a flat piece of 3/16' steel inside the trunk against the vertical corner area and beat it rearward with a mallet until the profile returned to its approximate position. That's why that area looks deformed in the above pic.
With the eyebrow about where it's supposed to be, I cut out the area above the tail light where the panels formerly overlapped, and also cut off the vertical portion of the deformed eyebrow:
At this point I was creating maneuvering room for continuing the repair.
I made a couple of templates from the undamaged passenger side. Here's the eyebrow template:
The other template (pictured a few pics further down) is for the vertical curve of the side of the eyebrow, perpendicular to the first template. I might not need these templates since I will in effect be building metal to the trim piece, but it's nice to have them just in case.
First the upper patch:
I did a "cut and butt" along the top and tacked it in. The line for the eyebrow shape came partly from the template and partly from the passenger side eyebrow trim. Since it's a mirror image of the driver's side, I flopped it over to trace the shape. In addition, the horizontal ridge line needed to be positioned as a straight horizontal line from the trunk lip.
Next come the pieces that make up the overlapping flange that joins the quarter panel to the tail light panel. The lower flange first:
This has an offset along the bottom edge. I found a scrap piece of metal with an offset already formed in it, so I rolled over the edge on the vice to blend into the shape of the area below the patch. I spotted it in then formed the second patch to connect the eyebrow to the new flange. The two patches were rosette welded together to complete the close-in of the horizontal area.
I filled in my stitch welds along the cut and butt and ground them smooth:
This all was back in January 2025.
4/25/25 Today I resumed work on the eyebrow. I really wanted to make some progress and get this off my plate. Git 'r dun.
First, I formed and welded in the inner corner piece:
I made a couple of marks before I cut off the rusty piece so that I could reposition the hole properly. The 1/8" dimension is how far away the hole is from the curvature.
Now for the side area. I decided to make this in one piece, so I found a piece of scrap metal that was already stamped with a curvature, and started forming a bend:
This is a compound curve, which means the bend needed to stretch. If the bend was more than maybe an inch wide this stretch would probably not work. But as you can see, I was able to achieve the curve of the quarter panel and the curve of the inner area.
Test fit:
After doing some fine tuning I tacked it in place and test fitted the trim:
Starting to take shape but still pretty rough.
After some shaping and welding, here's what it looks like:
That is starting to look better.
A little more shaping, and it's starting to look like an eyebrow:
After some more welding and grinding, here we are:
This took a total of five pieces to reconstruct.
The second template tells the tale:
Nice.
I test fitted the tail lights:
This might be the least attractive styling feature of this otherwise beautiful car. The GTO tail light is much more attractive:
Heck, even the Tempest is better looking:
5/14/25 Back to the repair. Time for some filler:
Initial sanding:
A little more hammer and dolly work was needed. Then came a second application of Bondo.
Repairing The Trunk Corner
You can see above that the corner of the trunk area is rusted out, so let's get that fixed. The first thing to do is to put the trunk lid back on to check the gaps.
The passenger side is pretty nice, but the driver's side is not right:
Even if this area wasn't already rust damaged I would still fix it by slitting it open along the trunk edge and rewelding it. But since the metal was gone it the replacement metal needed to be gapped properly.
After cleaning up the area and cutting away the rusty metal the inner structure was revealed. It was rusty as well so I cleaned it up and shaped a piece of sheetmetal to replace the rusted part of the flange.
I welded it in:
I then shaped the outer patch and welded it in:
The positioning of the patch was a little less than 1/8" from the previous location of the trunk edge, this to get a good gap with the trunk. So it was narrow enough to weld without additional filler metal.
I put on a third coat of Bondo and unnecessarily spread some over this area:
"Unnecessarily" because I sanded almost all of it off. A little glazing putty here would have sufficed.
Seam sealed and primed:
Yes, I'm jumping ahead to the primer stage. So let's backtrack.
The third coat, sanded out, flat, and ready to proceed:
Yeah, baby. Look at that gap.
5/19/25 I put on a thin coat of glazing putty:
In total this required three applications of Bondo plus the putty, almost all of which got sanded off. There might be a 1/16" of filler in total. I'm not skilled enough to metal finish, so that's the nature of bodywork in order to achieve a good surface.
Sanded out and primed:
And here it all is in the glory of its beauty:
May I say, this is brilliant. It is sort of surprising that it came out this straight, considering the severity of the damage. I am very nearly astonished at how good this looks. The trim fits perfectly, the shape is spot on, it's flat, and the corners have the perfect roll over, all without gobs of Bondo. And although it was a lot of work I didn't in my wildest dreams think I could get this properly repaired.
I needed to save an unreproduced panel as well as a problematic rear area of the quarter, and I did.
Pat myself on the back.
Very satisfying.


No comments:
Post a Comment