October 5th, 2024:

October 6th, 2024:

Episode one, introduction, here.
Episode two, disassembly and assessment, here.
Episode three, rough body work, here.
Episode four, quarters, here.
Episode five, toe panel, rockers, here.
Episode six, fenders, inner fenders, here.
Episode seven, the doors, found here.
Episode eight, tail light panel, hood, found here.
Episode nine, Hood, trunk, windshield gutter, cowl and firewall, heater box, found here.
Episode ten, Back glass gutter, grill, found here.
Episode eleven, headlight extensions, core support, roof, found here.
Episode twelve, final body prep and reassembly, found here.
Episode thirteen, bonus episode, final photos, found here.
----------------------------
Driver's Fender
This fender is perhaps the best old car fender I've ever seen rust-wise, going back to my very first car projects decades ago.
It does have the typical rust behind the tire:

I wirebrushed the inside and POR15d the surfaces:

Cut and shaped a patch:

Welded and ground smooth:

This fender also had some damage to the headlight peak. So I took a blunt chisel to the inside and hammered the peak forward. The damage was not as bad as the passenger fender, however (see below). Here's the initial results:

I perfected the edge with some weld. I ground it smooth and did a test fit:

I'm happy with that.
There were a few small dents in the fender, so I stripped the paint and worked the dents:

Then I sprayed some random primer:


There's still some work left to do here, so this primer is pretty much just a lifter of my spirits.
Sanded and touched up with glazing putty:

That is the process to get the surface corrected to perfection, with multiple applications and sandings of the primer until it has gotten me to the point where it blocks out smooth.
Here the finished fender:

5/19/25 I wirebrushed, sanded, and undercoated the inner surface:

Done.


This pic is of a '66 Tempest two door sedan. It's a somewhat unusual look, and it's strange that the lowest line A body has trim the higher models do not have.


Passenger Fender
The obvious: I needed a replacement fender:
But I didn't buy one because this is a budget build. A decent replacement OEM fender is maybe $600 or more with shipping. But, I should have sprung for one.
This has trim holes along the top edge, which seems to be a Tempest feature:
As we will discuss later, my fenders are both 1966, and the passenger side seems to be from a Tempest.
As mentioned in Episode three, I turned the fender over on the ground and stepped on the dent, which did a lot:

It was at this point I began thinking I might be able to actually fix it. My big old foot worked surprisingly well, and may have saved me some coin. But it's nowhere close to flat. There's a lot of misshapened metal, as well as some unwanted trim holes. The next six months of work would finally result in a usable fender. But I don't know if it was worth it.
I started bringing it into proper shape. First I stripped the fender and then I spent a couple of weekends hammering:
It turns out the headlight area also had damage I hadn't noticed before.
It took a hit there and the area was pushed back at the edge, and bulged out in the area where the "326" emblem is located.
I've been working that area too:
It's a little hard to see, but you can just make out the remnants of a vertical ridge line to the left of the headlight lip. This was a pushed up area, which I've been working back down. The lip of the headlight still needs to go forward. You can also see that the flange where the headlight bezel mounts is folded back.
I put a stack of three short 2x6s on the floor and turned the fender up on its nose:
I hammered on the interior with various chisels, pry bars, blunt screwdrivers, etc, to push the front lip down (forward), checking my progress by fitting the headlight bezel:
This is getting closer. Considering how misshapen this area was, the fit is very nearly a miracle.
I added some weld to key areas and dressed them out:
Very pleased with this.
I then got the front edge of the fender hammered out close and gave it a thin coat of filler:
Sanded it out and primered it:
Next I needed to fill the trim holes along the top of the fender. I shaped a piece of scrap with my angle grinder, leaving the piece attached, which gives me a handle:
Test fit:
After putting on a spot weld I cut off the "handle" and welded the rest of the perimeter.
After I got all the holes welded I did some more dollying on the panel, and also used the shrinking disk in various places.
I used a straightedge to check the progress, and once I got the panel close I started adding filler:
This was an initial coat of Bondo followed by sanding, then some spot putty. I blocked and filled until it started looking pretty good, then sprayed a couple of wet coats of primer:
Honestly, the pictures look better than it actually is. The basic shape is there, but there's a lot of uneven filler, scratches, and surface flaws. It is about to the point now where if I were to go out and buy a fender, this would be the starting point. That means I've invested all this work to get to the place where I'm actually going to work this fender. Wow.
After the primer dried I sanded it out and put some more putty on the flaws:
Like the driver's fender, the lower area was rusted out:
I waited to fix this until I was absolutely sure the other damage was fixable.
I cut out the rust:
There were a couple of rust perforations to the brace, but it was pretty solid otherwise. I wirebrushed as much as I could reach, welded the perforations, and brushed on some POR15:
I cut a patch:
I also welded up the lower rectangular trim hole. Dressed out:
I sanded out the whole fender and reprimed:
After all this work I really thought I had this fender all sorted out, but when I was mocking up the car for gaps I found a problem:
At first it seemed the fender was damaged in yet another way. In actual fact, most of the problem was that the fender dropped when I tightened it up (you can see it at the A pillar cover).Lining it up properly resulted in a much improved situation:
This very nearly solved the problem, except for the area just below the antenna hole. I put a straightedge here and this area definitely needs to come up. You can see also in the picture that the curve of the fender is starting to run proud of the door as it descends.
I continued to work this area until I got it flat, but I don't have pics.
Though this area is pretty much fixed, I'm still not happy. As I stood back and looked at the installed fender it just didn't look right. A panel can be flat and smooth, but when installed it still has to actually look right.
I don't have a picture, but this flashback photo from above sort of shows the problem:
I'm a little surprised I didn't notice the incorrect subtle inward curve of the character line above the tire, as well as how the fender bows out behind the tire.
This just won't do. So I took it off, laid it inside up on my thick rubber floor mat, and took a 12" piece of 3/16" flat steel and a mallet to the inside of the character line. I used the long edge of the steel as sort of a super-long beating bar, and the rubber mat had some give in it so the metal could move.
It eventually needed to come out 1/4". Wow.
I then turned the fender over and blocked it up with some 2x6s so the edges of the fender weren't on the floor, then put my foot at the 10 o'clock position of the wheel arch and pushed down. Several times. It worked. The wheel opening no longer looked like a mobius strip.
Last was the shape of the door edge. This is a reinforced area of the fender, but it needed to move. I put some serious force on it and it moved, just a little. But a little was all I needed.
I put the fender back on and shimmed it:
Yep, you can see that some of the filler needed to be redone because I cracked it when hammering out the character line. But even with the new unsanded filler on the panel you can see the character line follows a proper very slight outward curve and upward arch. Also, the area behind the tire is now on the same plane as the door and the back of the wheel arch does not bulge out. Lastly, the door gap vertical curve is much closer to the door shape. Granted, it's not perfect, but it will have to do. It's as close as I can get it without risking destroying the fender.
Ultimately, I will point a prospective buyer to these blog entries and let him judge for himself if the fender should be replaced. Sometimes it's just better to by another, straight fender, even if the repair is adequate.
5/19/25 I wirebrushed, sanded, and undercoated the inner surface:
This pic also give you an idea of the residual damage. You can really see where I did a lot of hammer work.
Doing the inner surface also turned up some rust I had forgotten about, the lower fender mounting point. I cut out the rust:
I thought I was going to have to recreate this area, but when I went to the scrap bin this was sitting right on top:
This was the leftover portion of the repair panel for Lemans #1. It has just what I need, and I wasn't even looking for it. What luck!
So I cut out what I needed and POR15d the brace:
I welded it in, ground out the welds, and put on a little putty:
I'll probably need to open up the mounting hole a little and of course sand and prime it, but otherwise, job done.
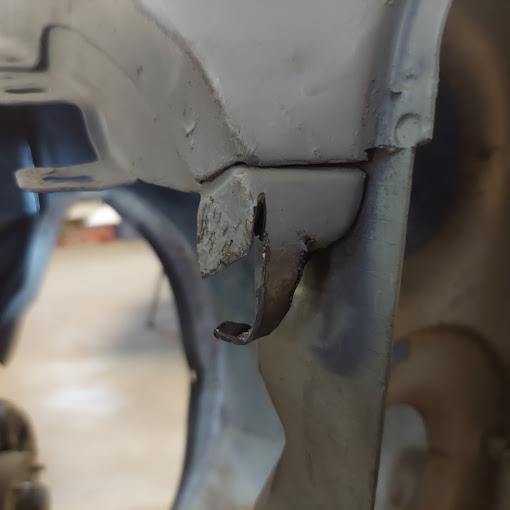
1966 Fenders?
Now that I bought a grill header and bodyworked it (episode ten), and my fenders are temporarily installed, I can mock up these pieces to see if everything fits. Surprise, there's a problem:
Sigh.
The grill header extensions (I'll call them "nubs") were smaller than the grill header. I now wondered what parts I had. So was the grill header I bought actually 1967? Were the fenders actually 1967? First I checked the grill header. The a grill header came as a complete assembly (Episode ten), so happily I had something to compare with. The upper grill trim eyebrows on the '67 are "L" shaped pieces, while the '66 forms a loop. My assembly came with the "L" shaped trim. I also have the original Lemans grill pods that came with the car. The Lemans pods fit the grill header so it is confirmed as 1967.
This means the fenders are suspect. I did a little checking around on the internet and found that 1966 and 1967 fenders were a very similar stamping, except for these nubs, and also the wheel lip flange has cutouts where the inner fender is bolted. And as I discovered in Episode twelve, the headlight extensions have mounting holes that don't line up with these fenders.
Then I remembered that I had another driver's fender that came on the car when I bought it, laying outside next to the shop. Which nub did it have?
Ah, the bigger one. So this fender fits the grill header. Also notice the little recess for the headlight bezel.
What about the wheel opening flange?
It has the cutouts, which the factory added in 1967 for tire clearance. This fender is a 1967.
So both fenders on the car are 1966. I needed to modify them.
Modifying the Nubs
I made a template from the 1967 fender:
Looking at the small 1966 nubs, there's a good amount of metal that tucks under, so I don't think I'll have to make the whole nub. I took some measurements on the 1967 nub made a couple of vertical cuts, on the left and right:

This is the only pic I have from the passenger side.
After making the cuts and shaping the tab, I started work on the headlight trim recess. Honestly, I didn't know if both sides should have this recess, but I decided to do both. This little detail is a bit of work, but after a some thinking I came up with a plan.
I cut a patch and welded a little filler wedge on it:
I welded only the back side because grinding the weld on the front would be too difficult. A little filler along this seam is be a lot easier.
Here's the patch test fitted:
Don't worry about that ragged lower edge. I evened it up later.
After a lot of tweaking and grinding, I was satisfied with the fit and welded it in:
I also made a side extension, then ground all the welds:
The two sides took most of the day, and nothing got crossed off my punch list. Yet another reason why I failed my 6 month deadline.
I cover the fitment of the nose piece and hood in Episode nine.
Driver Front Inner Fender
11/9/24 My inner fenders are surprisingly good, requiring only one repair to the front corner of the driver's side panel:
I figured I could fix this with two pieces. First piece:
And second piece:
That wasn't terribly hard.
5/1/25 Time to get back to the inner fenders. I ground the welds smooth, wirebrushed and sanded myself silly, then put on some POR15:
I bought a quart of gloss black, maybe should have got semi gloss. Oh well. Job done.
No comments:
Post a Comment